每次重烧录各种SBC的镜像后,最麻烦的一件事就是联网,虽然说连了网线,有了IP,但是有些网站还是无法访问的,这时候需要配置代理方便访问GitHub.
比如我就写一个简单的VLESS配置,先下载二进制文件的xray-core启动并放一个窗口内.

{
    "log": {
        "loglevel": "debug"
    },
    "inbounds": [
        {
            "port": 49152,
            "protocol": "dokodemo-door",
            "settings": {
                "network": "tcp,udp",
                "followRedirect": true
            },
            "streamSettings": {
                "sockopt": {
                    "tproxy": "tproxy"
                }
            },
            "listen": "0.0.0.0"
        }
    ],
    "outbounds": [
        {
            "protocol": "vless",
            "settings": {
                "vnext": [
                    {
                        "address": "[服务器IP地址]",
                        "port": [服务器端口],
                        "users": [
                            {
                                "id": "[服务器UUID]",
                                "encryption": "none",
                                "flow": ""
                            }
                        ]
                    }
                ]
            },
            "streamSettings": {
                "network": "ws",
                "security": "none",
                "sockopt": {
                    "mark": 2
                },
                "wsSettings": {
                    "path": "/favicon.ico?ed=2048",
                    "headers": {
                        "Host": "qiniucdnct.inter.iqiyi.com"
                    }
                }
            },
            "tag": "proxy"
        },
        {
            "protocol": "freedom",
            "settings": {},
            "streamSettings": {
                "sockopt": {
                    "mark": 2
                }
            },
            "tag": "freedom"
        },
        {
            "protocol": "blackhole",
            "settings": {},
            "tag": "blocked"
        },
        {
            "tag": "dns-out",
            "protocol": "dns",
            "settings": {
                "address": "8.8.8.8"
            },
            "proxySettings": {
                "tag": "proxy"
            },
            "streamSettings": {
                "sockopt": {
                    "mark": 2
                }
            }
        }
    ],
    "routing": {
        "domainStrategy": "IPOnDemand",
        "rules": [
            {
                "type": "field",
                "port": 53,
                "outboundTag": "dns-out"
            },
            {
                "type": "field",
                "ip": [
                    "0.0.0.0/8",
                    "10.0.0.0/8",
                    "100.64.0.0/10",
                    "127.0.0.0/8",
                    "169.254.0.0/16",
                    "172.16.0.0/12",
                    "192.0.0.0/24",
                    "192.0.2.0/24",
                    "192.168.0.0/16",
                    "198.18.0.0/15",
                    "198.51.100.0/24",
                    "203.0.113.0/24",
                    "::1/128",
                    "fc00::/7",
                    "fe80::/10"
                ],
                "outboundTag": "freedom"
            },
            {
                "type": "field",
                "domain": [
                    "geosite:category-ads-all"
                ],
                "outboundTag": "blocked"
            },
            {
                "type": "field",
                "ip": [
                    "::/0"
                ],
                "outboundTag": "proxy"
            },
            {
                "type": "field",
                "ip": [
                    "0.0.0.0/0"
                ],
                "outboundTag": "proxy"
            }
        ]
    },
    "dns": {
        "servers": [
            {
                "address": "119.29.29.29",
                "port": 53,
                "domains": [
                    "geosite:cn"
                ],
                "expectIPs": [
                    "geoip:cn"
                ]
            },
            {
                "address": "223.5.5.5",
                "port": 53,
                "domains": [
                    "geosite:cn"
                ],
                "expectIPs": [
                    "geoip:cn"
                ]
            },
            "8.8.8.8",
            "1.1.1.1",
            "https+local://doh.dns.sb/dns-query"
        ]
    }
}
然后配置iptables的backend为legacy,因为nft对tporxy的支持并不好,所以需要修改一下.
sudo update-alternatives --config iptables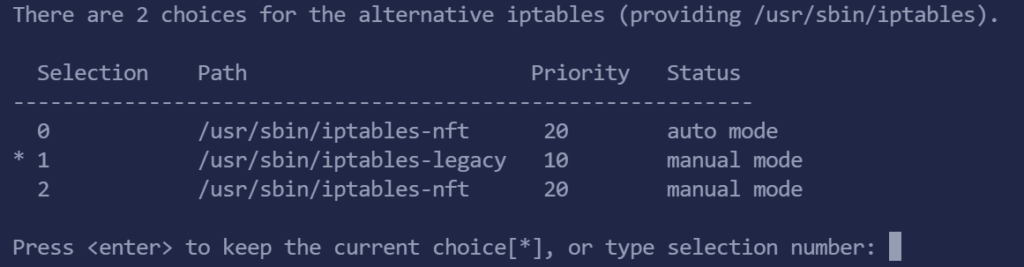
追加一个路由表到/etc/iproute2/rt_tables
echo "100 tproxy" >> /etc/iproute2/rt_tables依次创建规则.
ip route add local default dev lo table 100
ip rule add fwmark 1 table 100

iptables -t mangle -F

iptables -t mangle -N XRAY
iptables -t mangle -A XRAY -d 10.0.0.0/8 -j RETURN
iptables -t mangle -A XRAY -d 100.64.0.0/10 -j RETURN
iptables -t mangle -A XRAY -d 127.0.0.0/8 -j RETURN
iptables -t mangle -A XRAY -d 169.254.0.0/16 -j RETURN
iptables -t mangle -A XRAY -d 172.16.0.0/12 -j RETURN
iptables -t mangle -A XRAY -d 192.0.0.0/24 -j RETURN
iptables -t mangle -A XRAY -d 224.0.0.0/4 -j RETURN
iptables -t mangle -A XRAY -d 240.0.0.0/4 -j RETURN
iptables -t mangle -A XRAY -d 255.255.255.255/32 -j RETURN
iptables -t mangle -A XRAY -d 192.168.0.0/16 -p tcp ! --dport 53 -j RETURN
iptables -t mangle -A XRAY -d 192.168.0.0/16 -p udp ! --dport 53 -j RETURN
iptables -t mangle -A XRAY -p tcp -j TPROXY --on-port 49152 --tproxy-mark 1
iptables -t mangle -A XRAY -p udp -j TPROXY --on-port 49152 --tproxy-mark 1
iptables -t mangle -A PREROUTING -j XRAY

iptables -t mangle -N XRAY_SELF
iptables -t mangle -A XRAY_SELF -d 10.0.0.0/8 -j RETURN
iptables -t mangle -A XRAY_SELF -d 100.64.0.0/10 -j RETURN
iptables -t mangle -A XRAY_SELF -d 127.0.0.0/8 -j RETURN
iptables -t mangle -A XRAY_SELF -d 169.254.0.0/16 -j RETURN
iptables -t mangle -A XRAY_SELF -d 172.16.0.0/12 -j RETURN
iptables -t mangle -A XRAY_SELF -d 192.0.0.0/24 -j RETURN
iptables -t mangle -A XRAY_SELF -d 224.0.0.0/4 -j RETURN
iptables -t mangle -A XRAY_SELF -d 240.0.0.0/4 -j RETURN
iptables -t mangle -A XRAY_SELF -d 255.255.255.255/32 -j RETURN
iptables -t mangle -A XRAY_SELF -d 192.168.0.0/16 -p tcp ! --dport 53 -j RETURN
iptables -t mangle -A XRAY_SELF -d 192.168.0.0/16 -p udp ! --dport 53 -j RETURN
iptables -t mangle -A XRAY_SELF -m mark --mark 2 -j RETURN
iptables -t mangle -A XRAY_SELF -p tcp -j MARK --set-mark 1
iptables -t mangle -A XRAY_SELF -p udp -j MARK --set-mark 1
iptables -t mangle -A OUTPUT -j XRAY_SELF
现在应该就可以访问外部网络了,这里解释一下.
- mangle会排除内网流量,然后剩余的流量会打上标记1.
- 标记1的流量会走路由表100.
- 路由表100其实就是交给xray tproxy处理.
- 流量处理后会打上标记2
- 如果是标记2,输出链不要处理,不然就环路了.
- 输出路径排除到内网的路径.
但是每次开机这么折腾也很麻烦,所以当可以联网后,用Xray-install安装脚本安装完整版的再配置,至于防火墙这个,完全可以创建一个独立服务来启动.
root@debian:~# cat /etc/systemd/system/xray.service
[Unit]
Description=Xray Service
Documentation=https://github.com/xtls
After=network.target nss-lookup.target xray-routing.service
Requires=xray-routing.service

[Service]
User=nobody
CapabilityBoundingSet=CAP_NET_ADMIN CAP_NET_BIND_SERVICE
AmbientCapabilities=CAP_NET_ADMIN CAP_NET_BIND_SERVICE
NoNewPrivileges=true
ExecStart=/usr/local/bin/xray run -config /usr/local/etc/xray/config.json
Restart=on-failure
RestartPreventExitStatus=23
LimitNPROC=10000
LimitNOFILE=1000000

[Install]
WantedBy=multi-user.target
root@debian:~# cat /etc/systemd/system/xray-routing.service
[Unit]
Description=Xray Routing Initialization
After=network.target

[Service]
Type=oneshot
ExecStart=/usr/local/etc/xray/xray-routing.sh
RemainAfterExit=true

[Install]
WantedBy=multi-user.target
其中 /usr/local/etc/xray/xray-routing.sh 就是之前说打过的命令,这样不用每次开机打一次.
使能他们并全部自动启动.
sudo systemctl daemon-reexec
sudo systemctl daemon-reload
sudo systemctl enable xray-routing.service
sudo systemctl enable xray.service
sudo systemctl start xray.service

完美体验