VSC是个很强大的IDE,主要是有超多的插件支持,但是这也带来一些问题,各种东西都需要自行配置才能更好用,有点像当年的vim了吧.
在本地开发环境写代码,远程调试Linux上代码,如果说Linux有足够多的内存,那可以直接SSH Remote就可以,甚至如果不是ARM或X86就连SSH Remote也没办法,但是我这里讨论的不是这个情况,而是看似相当传统的几个步骤.
- 本地交叉编译
- 通过SCP上传目标程序
- 启动远程的gdbserver
- 开始调试
当结束时候就关闭远程的gdbserver,接着等下一次调试,只要把这些都加入到tasks.json中,实际使用体验并没多少差别,当然为了方便最好还是配置了密钥登陆,这样每次SCP就不用再询问密码了.
假设我今天要调试的程序是rtk_hciattach,目标的Linux板子的地址是192.168.31.49,并且目标板子已经预装好gdbserver这些一次性配置,那么我的tasks.json应该这么写.
{
"version": "2.0.0",
"tasks": [
{
"label": "CMake Build",
"type": "shell",
"command": "cmake --build build", // 调整为你的构建目录路径
"group": {
"kind": "build",
"isDefault": true
},
"problemMatcher": [],
"dependsOn": [],
"presentation": {
"reveal": "always"
}
},
{
"label": "Upload to ARM",
"type": "shell",
"command": "scp",
"args": [
"build/rtk_hciattach", // 调整为你的目标可执行文件路径
"root@192.168.31.49:/root" // 远程目标路径
],
"problemMatcher": [],
"dependsOn": ["CMake Build"],
"presentation": {
"reveal": "always"
}
},
{
"label": "Start gdbserver",
"type": "shell",
"command": "ssh",
"args": [
"root@192.168.31.49",
"pkill gdbserver; setsid gdbserver :2345 /root/rtk_hciattach -n -s 115200 ttySC1 rtk_h5 >/dev/null 2>&1 &"
],
"problemMatcher": [],
"dependsOn": ["Upload to ARM"],
"presentation": {
"reveal": "always"
}
},
{
"label": "Stop gdbserver",
"type": "shell",
"command": "ssh",
"args": [
"root@192.168.31.49",
"pkill gdbserver" // 停止 gdbserver 进程
],
"problemMatcher": [],
"presentation": {
"reveal": "always"
}
}
]
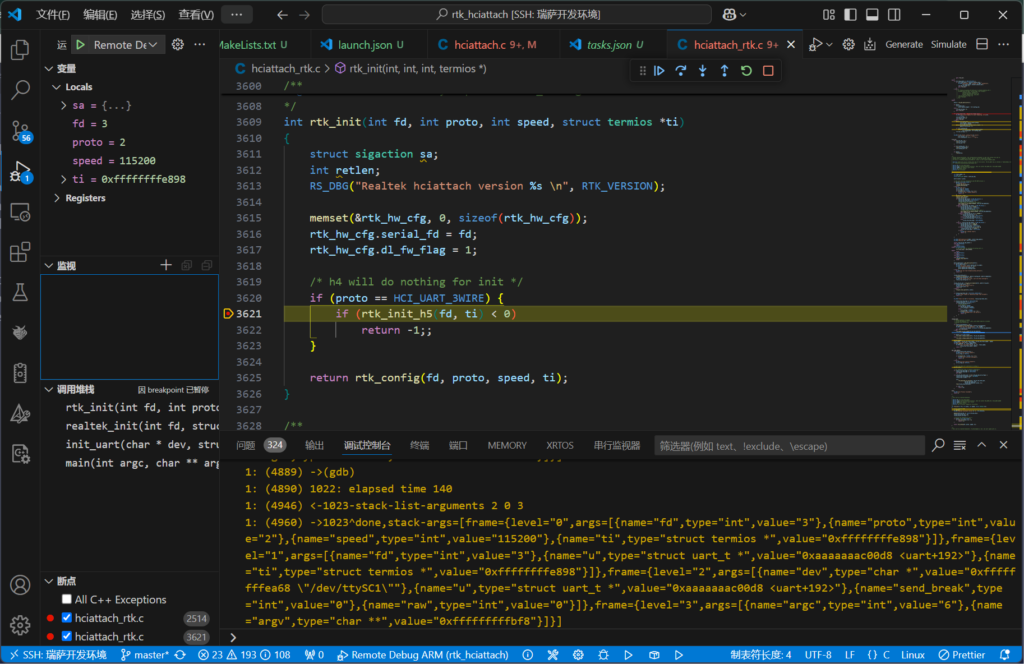
}然后调试的开始时候只需要调用启动GDB服务器的任务,就会触发前置任务编译并上传,而关闭时候只需要关闭GDB服务器就可以了.
{
    "version": "0.2.0",
    "configurations": [
        {
            "name": "Remote Debug ARM",
            "type": "cppdbg",
            "request": "launch",
            "program": "${workspaceFolder}/build/rtk_hciattach",  // 远程程序路径
            "args": [],
            "stopAtEntry": false,
            "cwd": "/root",  // 设置工作目录为/root
            "environment": [],
            "externalConsole": false,
            "MIMode": "gdb",
            "setupCommands": [
                {
                    "description": "Enable pretty-printing for gdb",
                    "text": "-enable-pretty-printing",
                    "ignoreFailures": true
                }
            ],
            "miDebuggerServerAddress": "192.168.31.49:2345",  // GDB server地址
            "miDebuggerPath": "/usr/bin/gdb-multiarch",  // 本地GDB路径
            "preLaunchTask": "Start gdbserver",  // 启动gdbserver任务
            "postDebugTask": "Stop gdbserver",  // 停止gdbserver任务
            "targetArchitecture": "arm",
            "logging": {
                "engineLogging": true
            }
        }
    ]
}
这样就可以顺利进入调试状态了.