环境要求:
- Anaconda3 (推荐,如果没有就很麻烦!)
- GPU + CUDA (推荐,如果没有会很慢!)
- Ubuntu xx.xx LTS (推荐,Windows下各种问题比较多!)
- 内存:16GB 硬盘:40GB
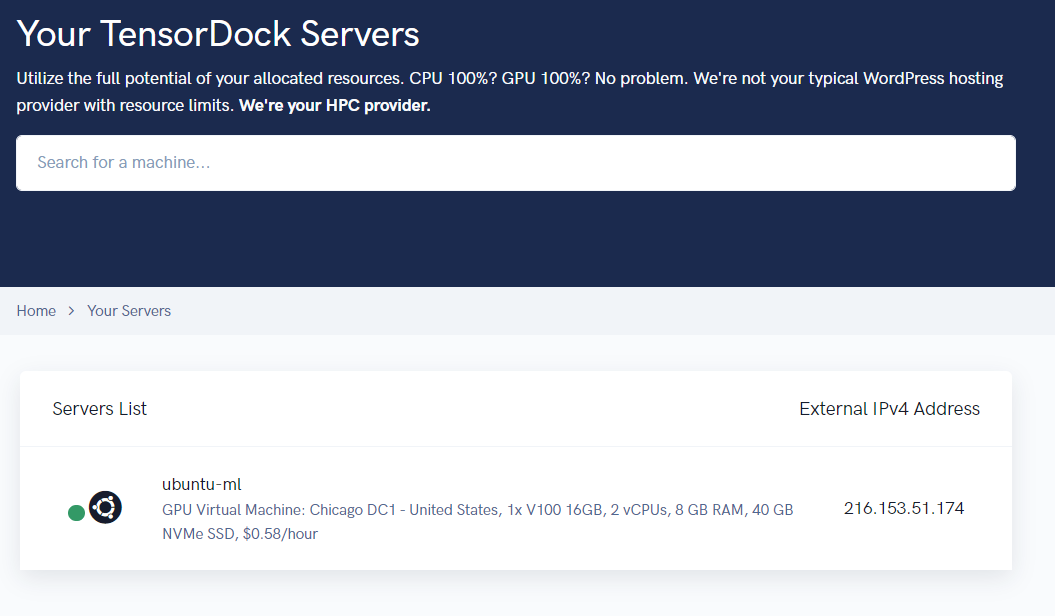
如果任何一个没有你都会很麻烦但是可以解决,我这里一次性推荐使用TensorDock,一个GPU云服务,开机自动配置好一切,短期使用价格合理.
创建虚拟环境并验证安装:
conda create -n tensorflow pip python=3.9
conda activate tensorflow
pip install --ignore-installed --upgrade tensorflow
python -c "import tensorflow as tf;print(tf.reduce_sum(tf.random.normal([1000, 1000])))"
有以下关键输出代表OK.
2022-05-29 03:02:09.203319: I tensorflow/core/common_runtime/gpu/gpu_device.cc:1532] Created device /job:localhost/replica:0/task:0/device:GPU:0 with 102 MB memory:  -> device: 0, name: Tesla V100-FHHL-16GB, pci bus id: 0000:05:00.0, compute capability: 7.0
tf.Tensor(220.2801, shape=(), dtype=float32)
为了快速实验,我已经把需要的实验代码创建成repo.
git clone --recursive https://github.com/nickfox-taterli/tensorflow-object-detection-api-tutorial-with-tf2下载并把protoc放到/usr/local/bin或者其他等效目录,下载地址:
https://github.com/google/protobuf/releases
我选择3.19.1,不是版本越新越好,重要是和TF匹配,先下载较新的,发现不好用再一个一个版本回退.
执行一些模型转换:
# From within ~/tensorflow-object-detection-api-tutorial-with-tf2/models/research/
protoc object_detection/protos/*.proto --python_out=.
安装coco API.
cd ~
git clone https://github.com/cocodataset/cocoapi.git
cd cocoapi/PythonAPI
make
cp -r pycocotools ~/tensorflow-object-detection-api-tutorial-with-tf2/models/research/
安装对象检测API.
# From within ~/tensorflow-object-detection-api-tutorial-with-tf2/models/research/
cp object_detection/packages/tf2/setup.py .
python -m pip install --use-feature=2020-resolver .
最后测试安装:
# From within ~/tensorflow-object-detection-api-tutorial-with-tf2/models/research/
python object_detection/builders/model_builder_tf2_test.py
测试结果如下为正常.
# ... 省略很多
[ OK ] ModelBuilderTF2Test.test_invalid_second_stage_batch_size
[ RUN ] ModelBuilderTF2Test.test_session
[ SKIPPED ] ModelBuilderTF2Test.test_session
[ RUN ] ModelBuilderTF2Test.test_unknown_faster_rcnn_feature_extractor
INFO:tensorflow:time(__main__.ModelBuilderTF2Test.test_unknown_faster_rcnn_feature_extractor): 0.0s
I0608 18:49:13.193742 29296 test_util.py:2102] time(__main__.ModelBuilderTF2Test.test_unknown_faster_rcnn_feature_extractor): 0.0s
[ OK ] ModelBuilderTF2Test.test_unknown_faster_rcnn_feature_extractor
[ RUN ] ModelBuilderTF2Test.test_unknown_meta_architecture
INFO:tensorflow:time(__main__.ModelBuilderTF2Test.test_unknown_meta_architecture): 0.0s
I0608 18:49:13.195241 29296 test_util.py:2102] time(__main__.ModelBuilderTF2Test.test_unknown_meta_architecture): 0.0s
[ OK ] ModelBuilderTF2Test.test_unknown_meta_architecture
[ RUN ] ModelBuilderTF2Test.test_unknown_ssd_feature_extractor
INFO:tensorflow:time(__main__.ModelBuilderTF2Test.test_unknown_ssd_feature_extractor): 0.0s
I0608 18:49:13.197239 29296 test_util.py:2102] time(__main__.ModelBuilderTF2Test.test_unknown_ssd_feature_extractor): 0.0s
[ OK ] ModelBuilderTF2Test.test_unknown_ssd_feature_extractor
----------------------------------------------------------------------
Ran 24 tests in 29.980s
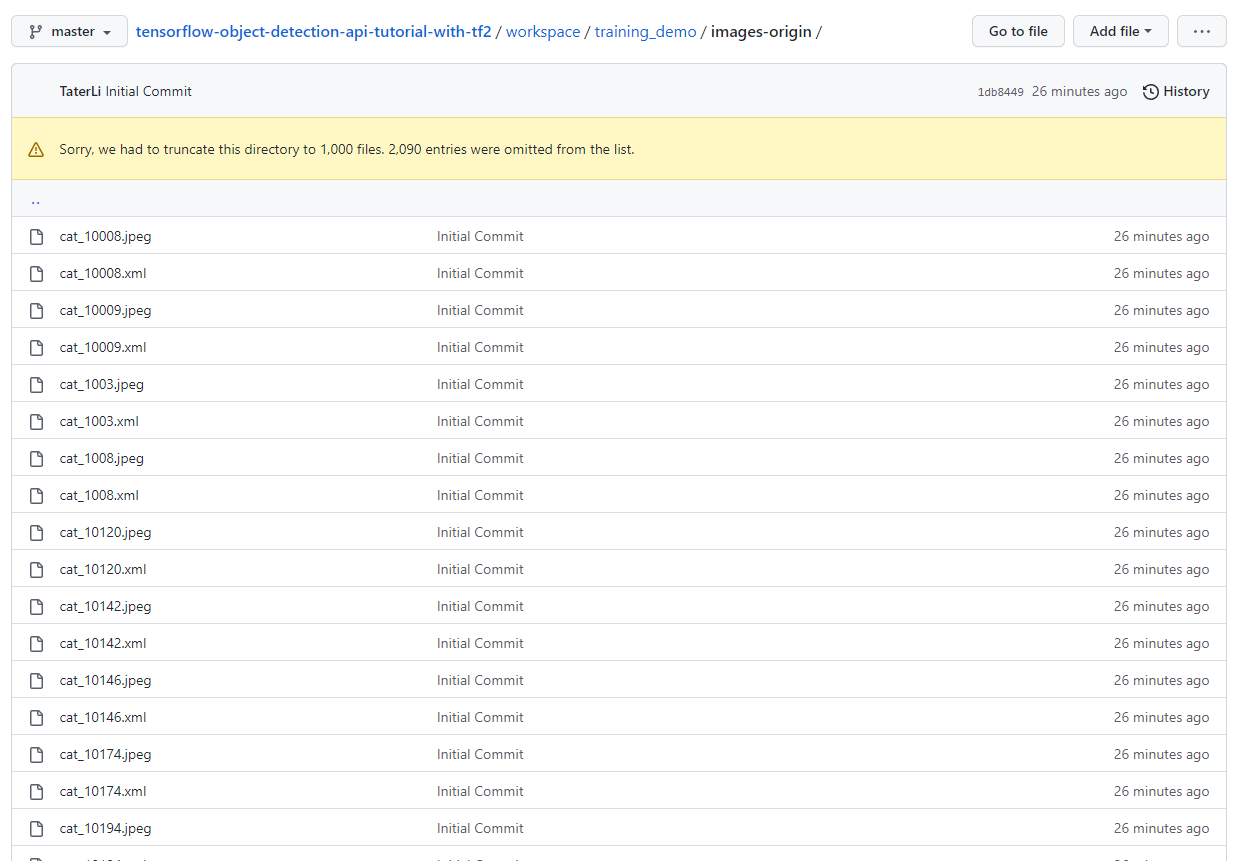
OK (skipped=1)在image-origin目录包含很多猫猫狗狗的照片,他们都是通过labelImg(具体用法网上自己查)标记的,分别包含对应的xml和jpeg,在实际使用中,应该自己拍非常多的照片并标记,由于这个很费时间,所以这里就先准备好数据了.
还要给数据设置标签,这个标签和labelimg是要一一对应的,文件我放在training_demo/annotations/label_map.pbtxt.
item {
    id: 1
    name: 'cat'
}

item {
    id: 2
    name: 'dog'
}
切割数据并生成tfrecord,建议阅读学习一下脚本.
# From within ~/tensorflow-object-detection-api-tutorial-with-tf2/script/preprocessing
python partition_dataset.py -x -i ../../workspace/training_demo/images-origin -o ../../workspace/training_demo/images -r 0.1
python generate_tfrecord.py -x ../../workspace/training_demo/images/train -l ../../workspace/training_demo/annotations/label_map.pbtxt -o ../../workspace/training_demo/annotations/train.record
python generate_tfrecord.py -x ../../workspace/training_demo/images/test -l ../../workspace/training_demo/annotations/label_map.pbtxt -o ../../workspace/training_demo/annotations/test.record
为了配置训练作业,一般去Model Zoo剽一个.
比如我下载一个SSD ResNet50 V1 FPN 640x640 (RetinaNet50)的模型,找到里面的pipeline.config,复制到http://models/my_ssd_resnet50_v1_fpn/中,当然这个目录也是我自己创建,可以是任意名字,光复制文件还不行,还有部分内容需要修改,具体可以参考我库里的文件对比.
- num_classes 有多少个不同的Label,我们测试只有2类.
- batch_size 一次取多少,取得多利用率高,内存也要的多.
- fine_tune_checkpoint 使用模型原有参数继续学习,需要把下载的模型checkpoint解压到指定的路径.我的库里指定了,但是文件由于比较大,未包含在库.
- use_bfloat16 由于没有在TPU训练,所以false.
- label_map_path 标签文件 (pbtxt,训练和验证都有)
- input_path 数据输入(tfrecord,训练和验证都有)
- metrics_set 优化目标
把预训练模型解压,并放到fine_tune_checkpoint指定路径上.
cd ~
mkdir ~/tensorflow-object-detection-api-tutorial-with-tf2/workspace/training_demo/pre-trained-models
wget http://download.tensorflow.org/models/object_detection/tf2/20200711/ssd_resnet50_v1_fpn_640x640_coco17_tpu-8.tar.gz
tar xvf ssd_resnet50_v1_fpn_640x640_coco17_tpu-8.tar.gz -C ~/tensorflow-object-detection-api-tutorial-with-tf2/workspace/training_demo/pre-trained-models
把models/research/object_detection/model_main_tf2.py复制到training_demo目录中开始训练(建议在screen中运行):
python model_main_tf2.py --model_dir=models/my_ssd_resnet50_v1_fpn --pipeline_config_path=models/my_ssd_resnet50_v1_fpn/pipeline.config
根据你显卡性能不同,大概等一会能看到每100步的输出.
I0529 03:25:09.143892 139699402731712 model_lib_v2.py:708] {'Loss/classification_loss': 0.03322457,
 'Loss/localization_loss': 0.049729176,
 'Loss/regularization_loss': 0.15188748,
 'Loss/total_loss': 0.23484123,
 'learning_rate': 0.029921034}
INFO:tensorflow:Step 9800 per-step time 0.484s
I0529 03:25:57.500304 139699402731712 model_lib_v2.py:705] Step 9800 per-step time 0.484s
INFO:tensorflow:{'Loss/classification_loss': 0.023190781,
 'Loss/localization_loss': 0.06909638,
 'Loss/regularization_loss': 0.15175259,
 'Loss/total_loss': 0.24403974,
 'learning_rate': 0.029682912}
I0529 03:25:57.500637 139699402731712 model_lib_v2.py:708] {'Loss/classification_loss': 0.023190781,
 'Loss/localization_loss': 0.06909638,
 'Loss/regularization_loss': 0.15175259,
 'Loss/total_loss': 0.24403974,
 'learning_rate': 0.029682912}
INFO:tensorflow:Step 9900 per-step time 0.485s
I0529 03:26:46.023310 139699402731712 model_lib_v2.py:705] Step 9900 per-step time 0.485s
INFO:tensorflow:{'Loss/classification_loss': 0.06559964,
 'Loss/localization_loss': 0.068514176,
 'Loss/regularization_loss': 0.15113617,
 'Loss/total_loss': 0.28524998,
 'learning_rate': 0.029442988}
I0529 03:26:46.023681 139699402731712 model_lib_v2.py:708] {'Loss/classification_loss': 0.06559964,
 'Loss/localization_loss': 0.068514176,
 'Loss/regularization_loss': 0.15113617,
 'Loss/total_loss': 0.28524998,
 'learning_rate': 0.029442988}
在另外一个窗口打开TensorBoard:
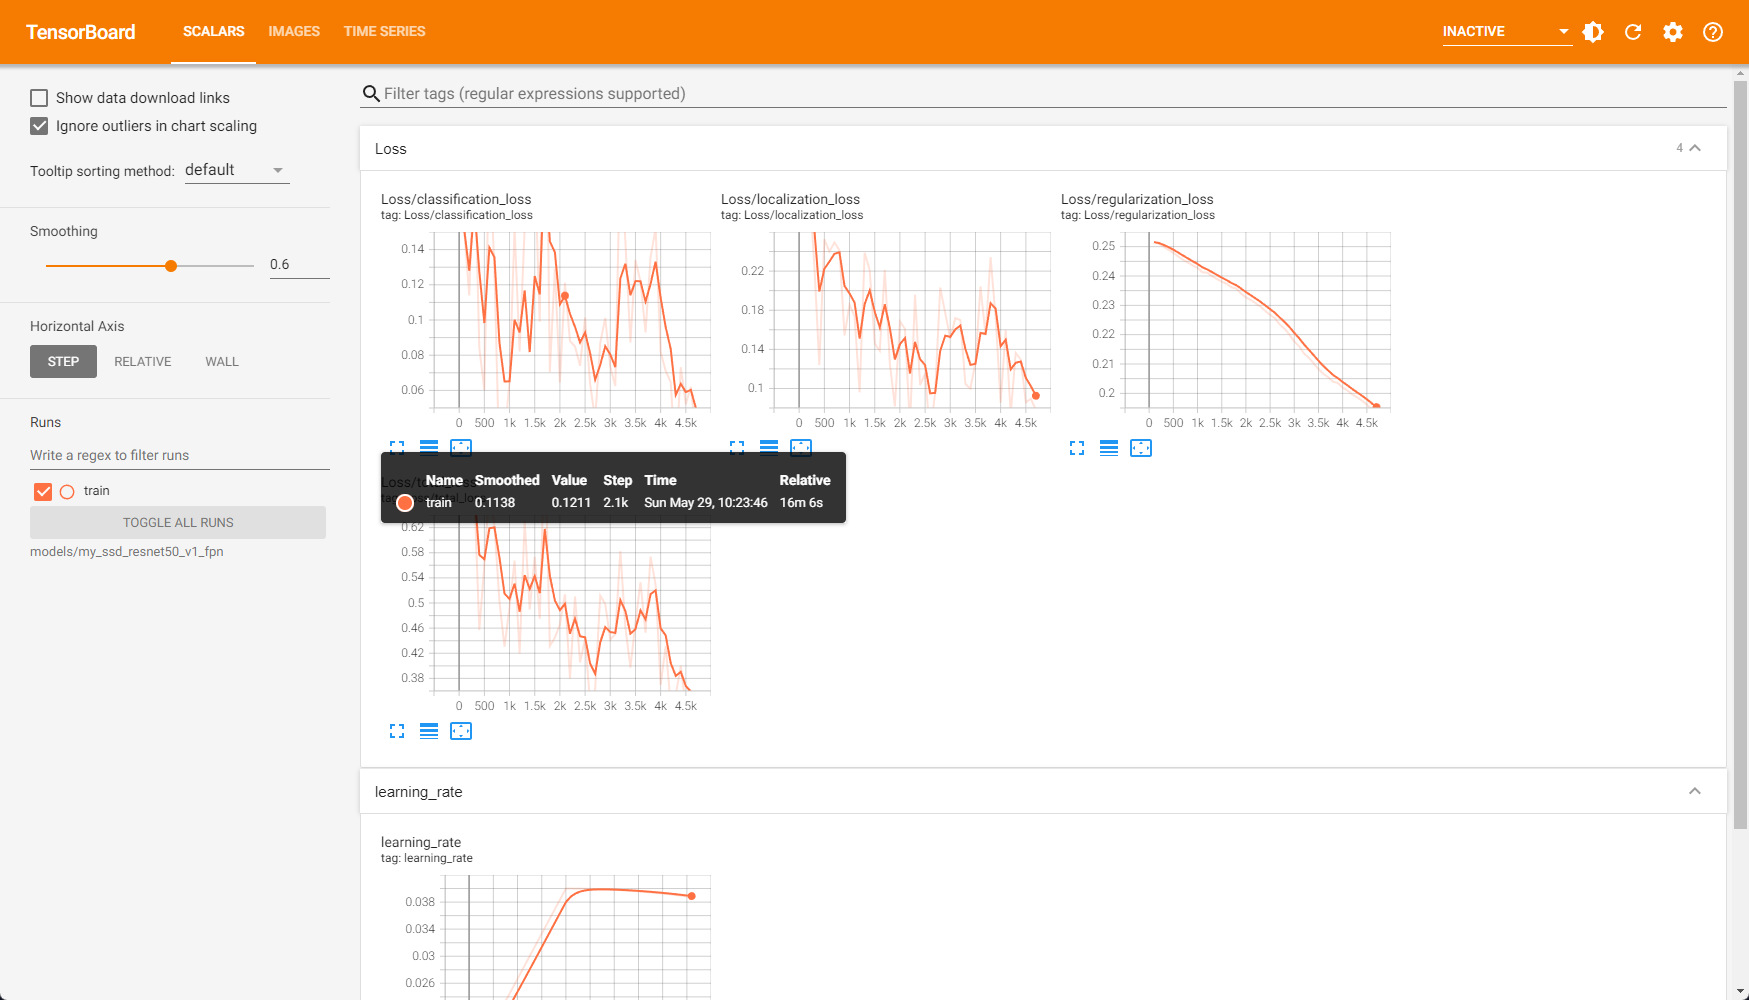
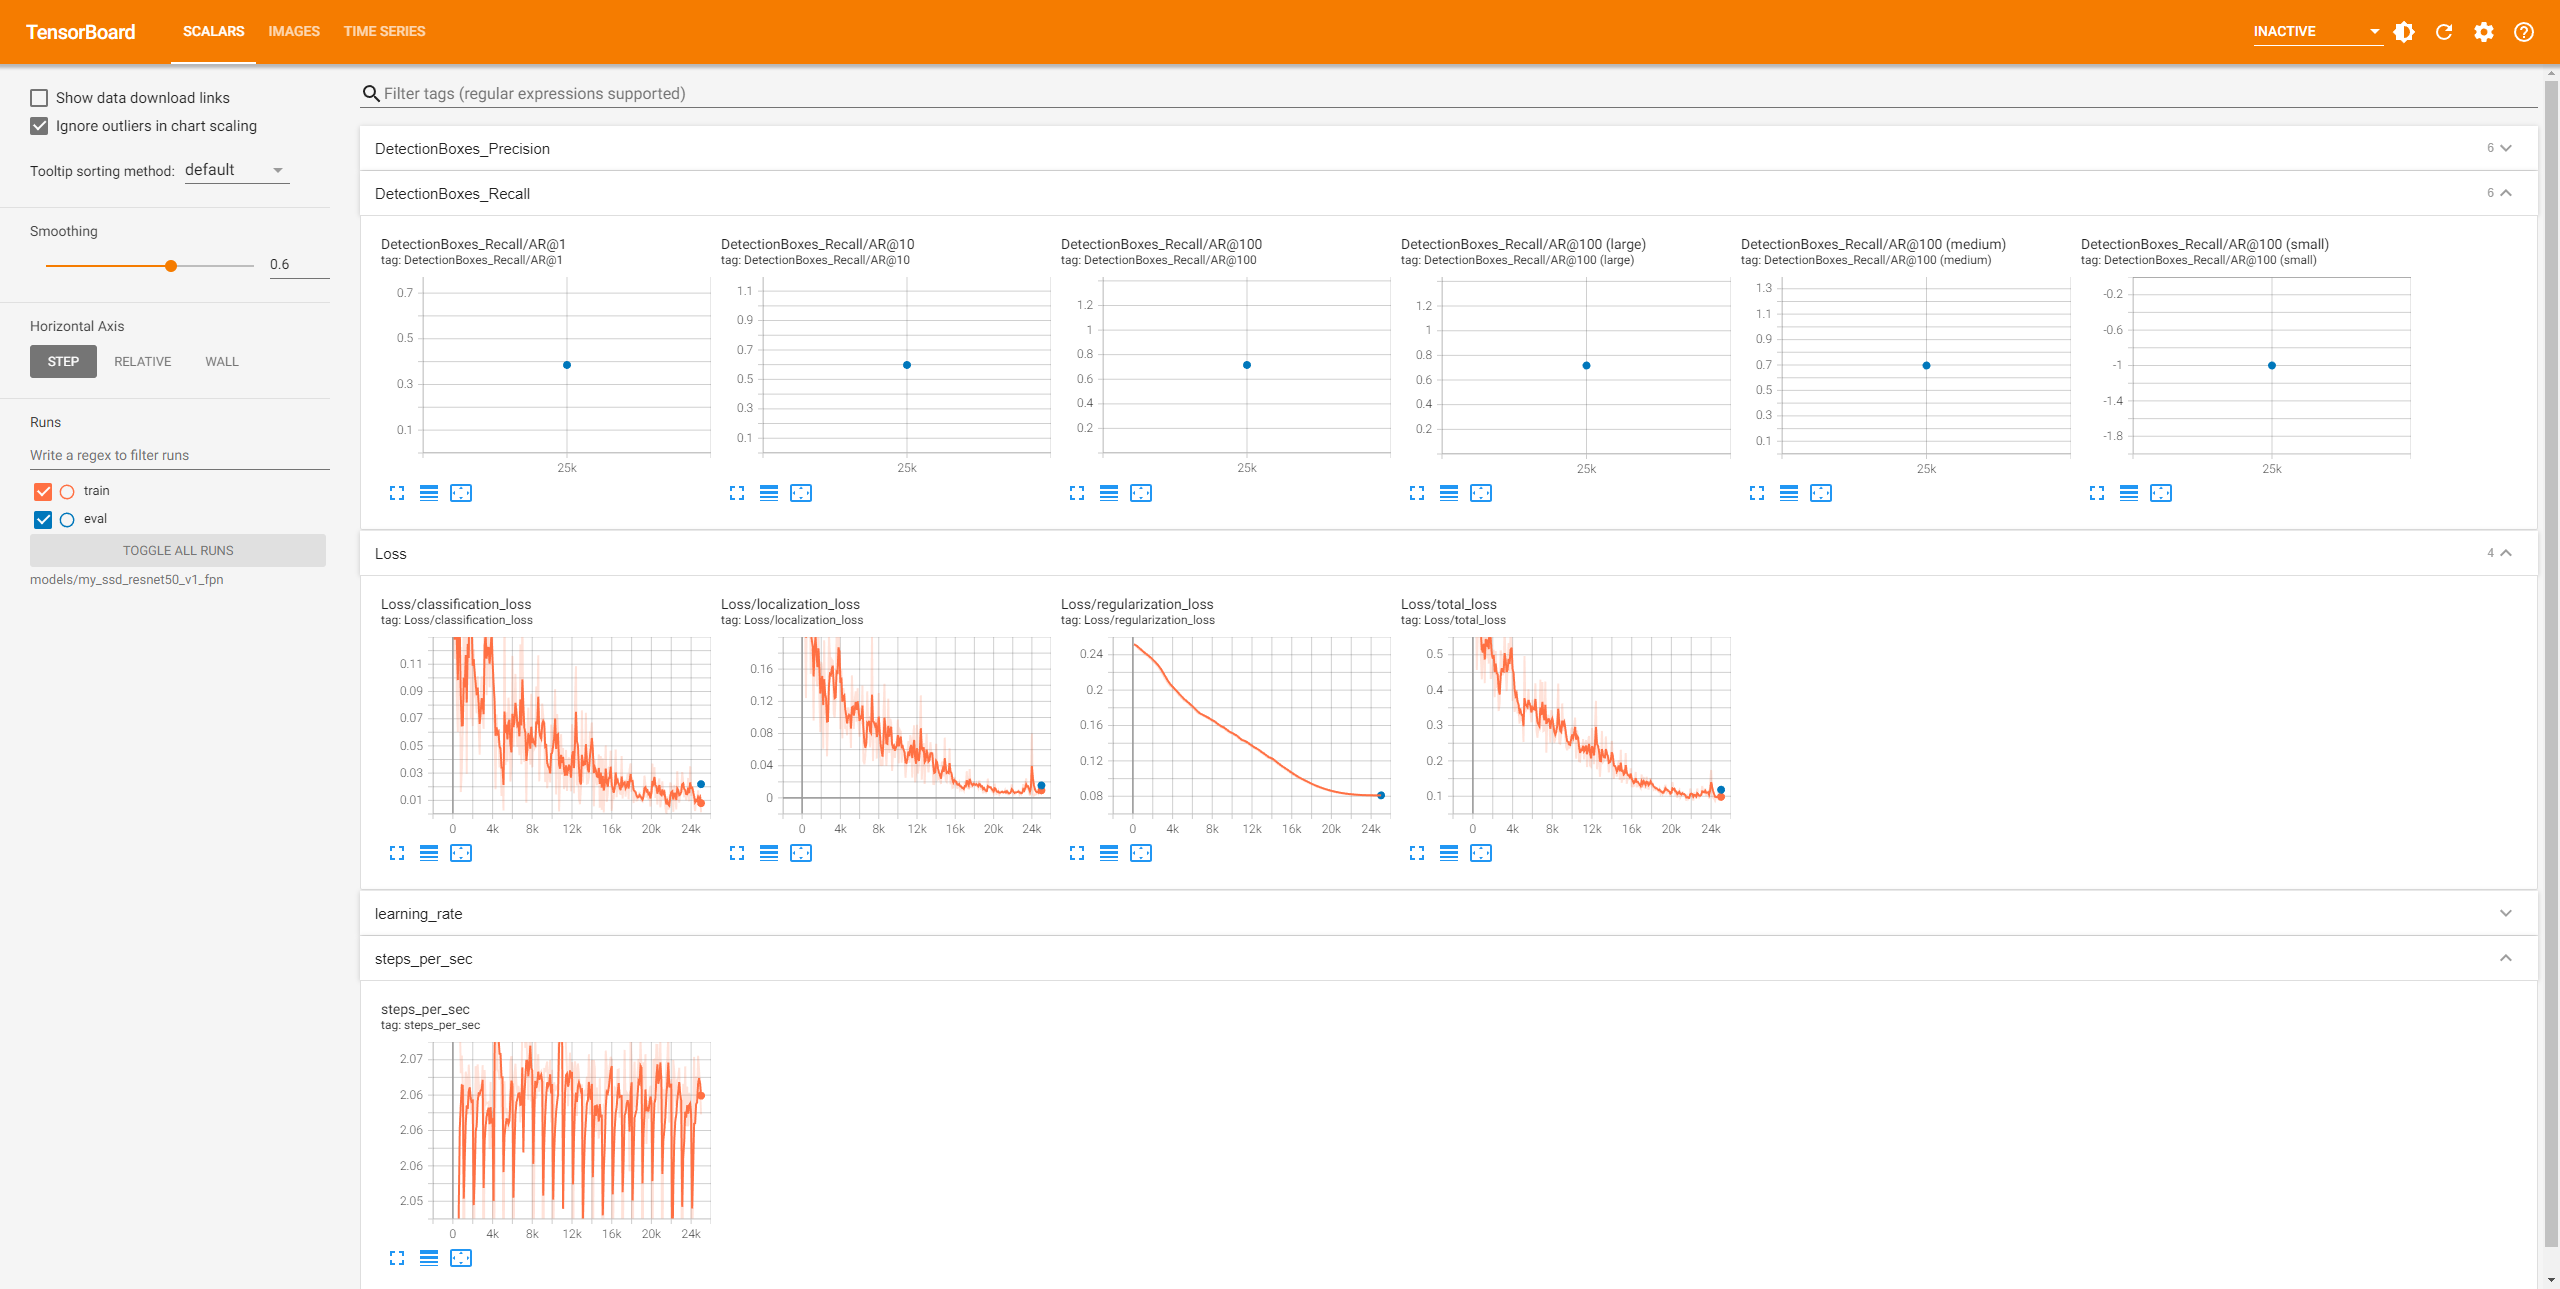
tensorboard --logdir=models/my_ssd_resnet50_v1_fpn --host=0.0.0.0在Web能看到训练进度,如果你使用CPU训练,可能需要数个小时才能看到数据,像我这个例子中的使用V100 GPU训练只需要在几分钟就能看到数据,并且我们可以看到太强大了,loss在下快速下降了.
训练完成后,我们再开一个进行评估测试.
python model_main_tf2.py --model_dir=models/my_ssd_resnet50_v1_fpn --pipeline_config_path=models/my_ssd_resnet50_v1_fpn/pipeline.config --checkpoint_dir=models/my_ssd_resnet50_v1_fpn
之后便可以看到eval数据.
对模型满意的话,导出模型,同样导出脚本来自models/research/object_detection/.
python exporter_main_v2.py --input_type image_tensor --pipeline_config_path models/my_ssd_resnet50_v1_fpn/pipeline.config --trained_checkpoint_dir models/my_ssd_resnet50_v1_fpn --output_directory exported-models/my_model现在训练是完成了,把我们保存的都拉下来,如果日后继续训练记得不要忘了checkpoint,不如来试试效果.
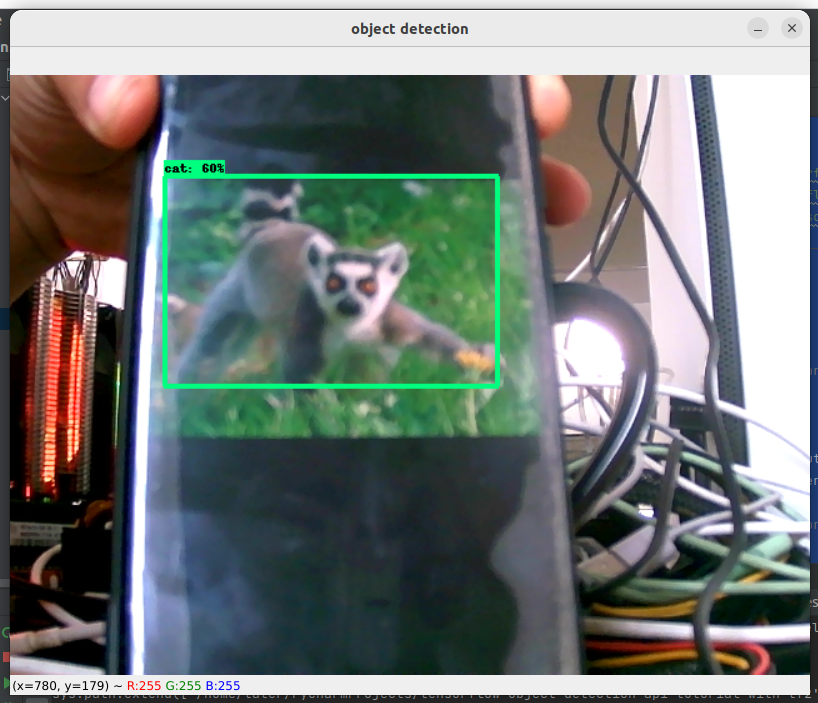
test_from_saved_model.py 是检测单个图片用途.

webcam_test.py 视频测试: